While working on the project we did not realised that we should not use symbolism. The visual representation should not be something that the people can recognise while looking at it. It was bit crushing knowing our prototypes do not work for this project since they were windmills. Literal representation of something real and easily recognisable.
With that we were back at square one. Even though the visual side of the project went to drain, Clint was satisfied with overall idea of presenting typing with feedback. He also suggested to think about different ways we can demonstrate instead of just the speed itself. For example different feedback for different events such as using capital letters, small letters, numbers or other keys both of these included.
Typing. According to Wikipedia typing is “the process of writing or inputting text by pressing keys on a typewriter, computer keyboard, cell phone, or calculator.”. How do you present something that is very natural activity into visual feedback? How to include servos within the process of it? Should it be a bracelet? Should it be with an led? Should it do magic tricks? How do we visualise typing?
These questions were part of my thinking process when working on this idea. On the one had we had to imagine and work with it, on the other hand we also thought about the code and what is possible for us to make. How to code it? Should we use visuals on the computer or just the servos? Are we using the json-serial bridge or are we coding everything in arduino? If we use arduino how we detect if they keyboard is being used?
Many questions were technical as much as idea wise. The basic idea was, write a code that will detect if a button is pressed. In our case we started out with vowels only. If they are pressed then make the counter go up and then use that number to set up the speed of the servo. It did not make much sense because even though it had a random factor within it was not as responsive as we wanted it to be.
Video of our first try to work with the code
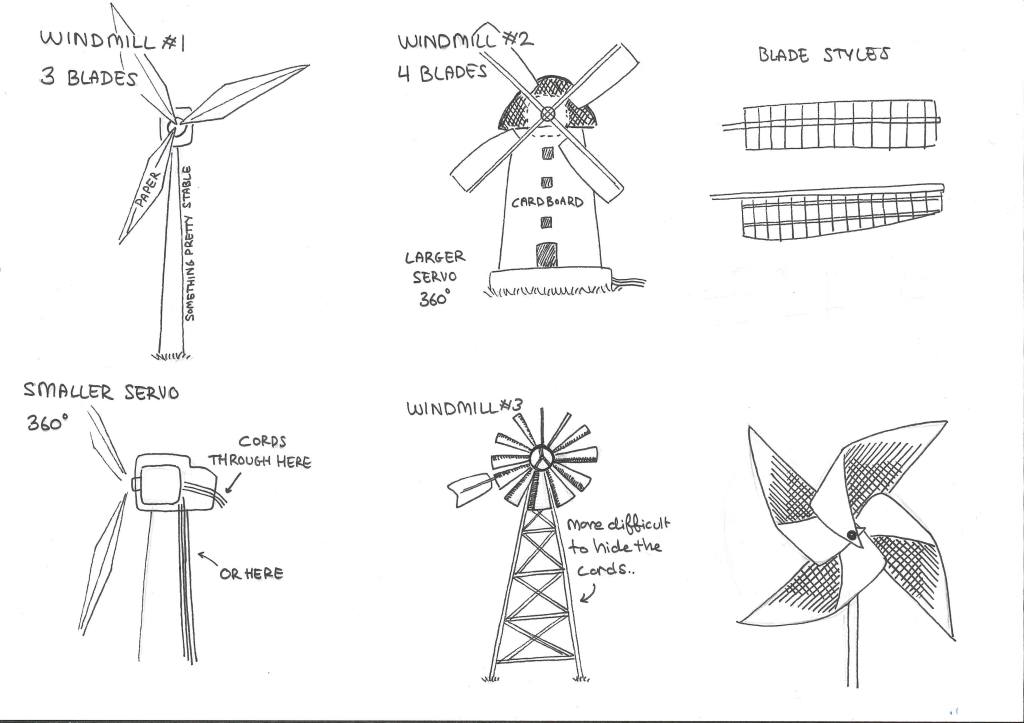
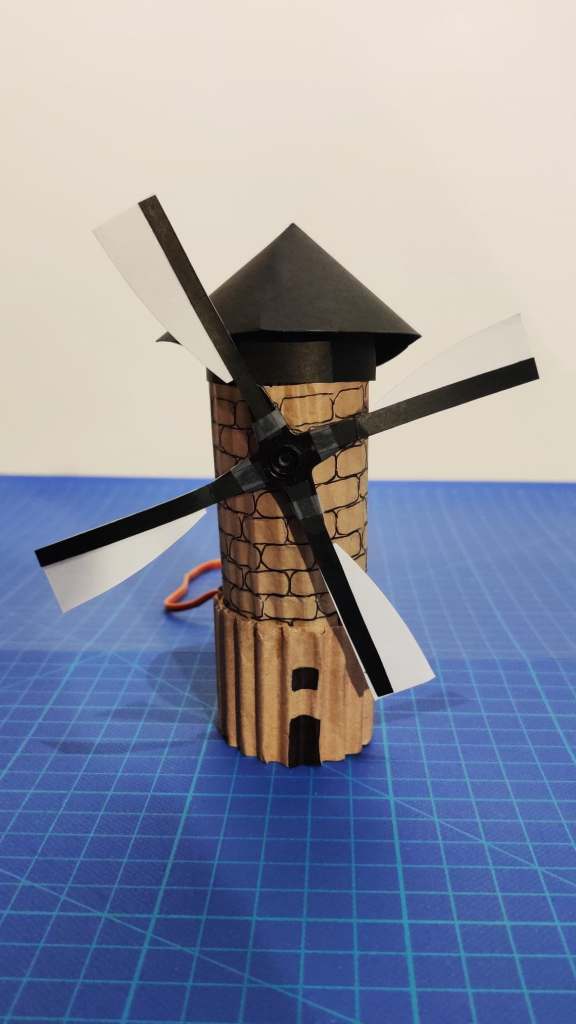
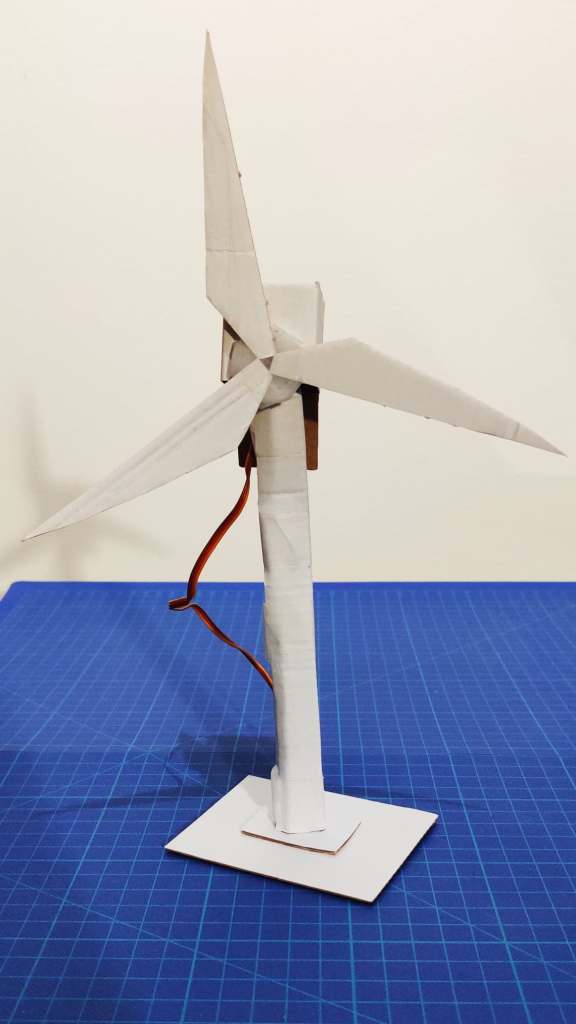
Meanwhile, while I was trying to figure out the code and make the servo spin, Thanita focused on brainstorming ideas in which we can present the activity. Windmills. They spin, which will be simple and easy way to implement the servo and make it nice and easy for visuals.
Visual Representation
Since we both liked the idea, we started working on our first prototype. It was made out of cardboard, that contained the servo in the middle to represent the motor of the windmill. With that we wrapped up for today.
Our first prototype
The next day, I worked on the code while she worked on making more versions of the windmill. Both of them were made out of paper, since it was the most convenient material at this stage of experimenting.
The paper prototypes did turned out to be useful, for visualising our idea, that we had previously sketched out. It felt like we have done progress and it was inspiring to keep working with what we had so far.
Our windmills
With half working code, and quick prototypes, for the first time in a while I was looking forward to the next coaching session.
I never realised how important are these coaching session, until now. Having someone to guide you and give you feedback and critique that can only inspire you to work harder can be priceless. Meeting with Jens today, was very helpful for rhe progress of our project.
Even though we presented the same old ideas, that were not best neither were working with the presented script, we got the guide that was important to us to focus on the things that might work. The questions presented were how to look at them in different light? How exactly are we supposed to present the feedback while working with coping? How to showcase an continues activity without getting away from the topic?
In today’s coaching session we mostly spoke about what kind of feedback are we supposed to present. Jens explained that instead of being an output feedback it should be a type of feedback that represents an activity or amount of something. For example during the introductory lecture Clint gave this example of showcasing the amount of memory on a computer disk. Instead of stopping what are we doing and checking we can just see it visually.
We spoke about walking as an activity that is being done without much thought put into it. For example presenting the speed of someone’s walk or presenting if they walk or run. How can we recognise the differences and present them in a visual form. Through the talk about speed and such we went back on a previously mentioned topic. Typing
As previously mentioned, one of the first ideas we worked with was with typing detection and the presenting the way we type. Since typing on a computer can be seen as a continues activity, Jens asked if we looked how to present the typing speed maybe or even work with the buttons that are pressed. For example present feedback if we type faster then slow. Inspired by the metronome, he also suggested that having visual can help you keep up a tempo that will make you write more or less depending.
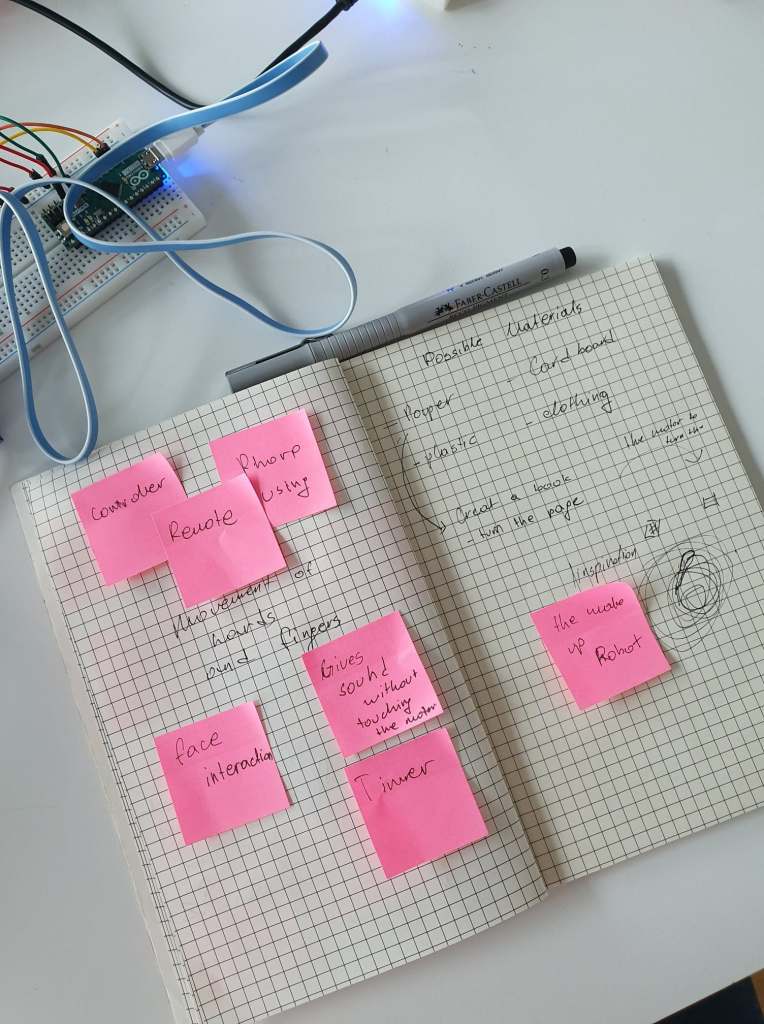
Understanding the topic and being inspired led us to brainstorming ways we can use the keyboard and the typing speed to present visual feedback of an activity.
After the last coaching session, it was clear that our ideas are bad or not good enough to support the script of the project or fulfil the requirements for Module II. Today we tried to sketch out few quick ideas and make quick prototypes of them.
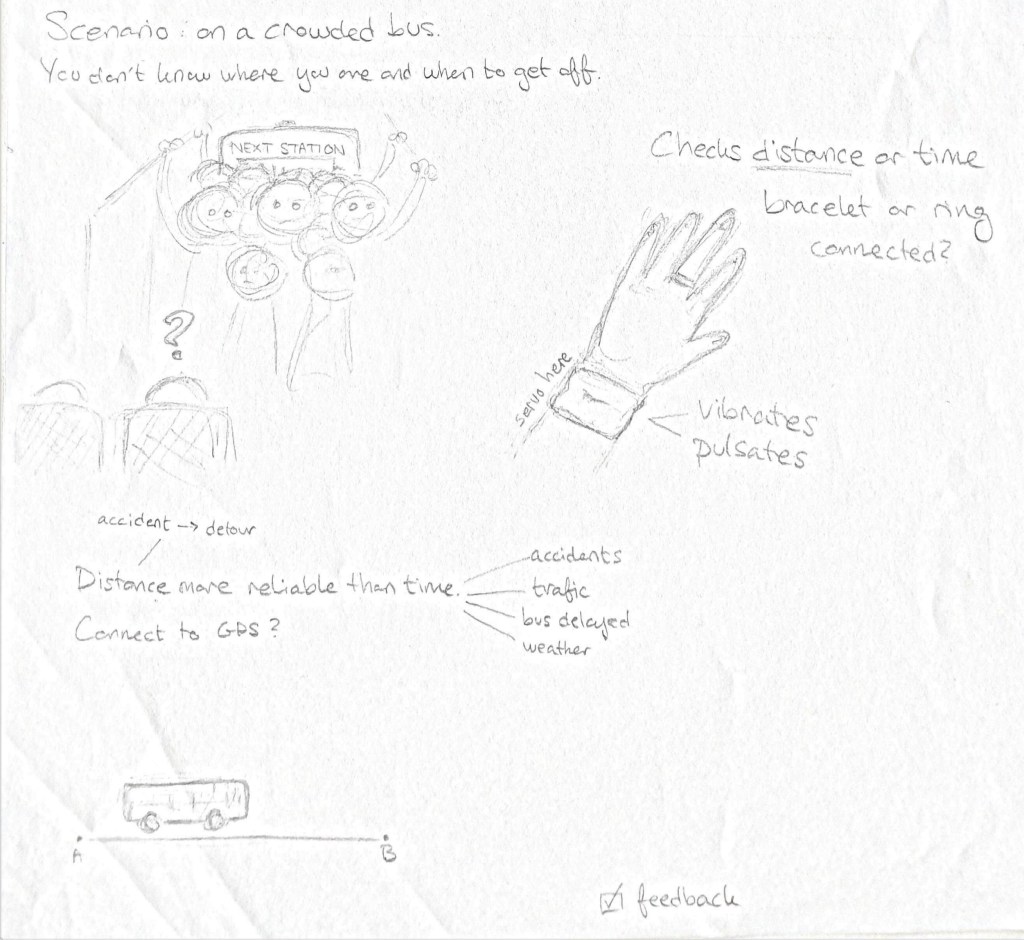
The project I was working on was inspired by giving out information when a person arrives at certain destination when taking the bus. For a lot of people long commute is an everyday thing. They take the bus or train to get to work, school and many more places that are far away from their homes. Since it is long period of time while travelling we might lose track of it and miss the station we are supposed to get off.
According to my personal experience with taking the bus is that is an activity I can do other things while waiting to arrive at my destination. Sometimes I lose track of time and forget to check if the bus is arriving close to the station.
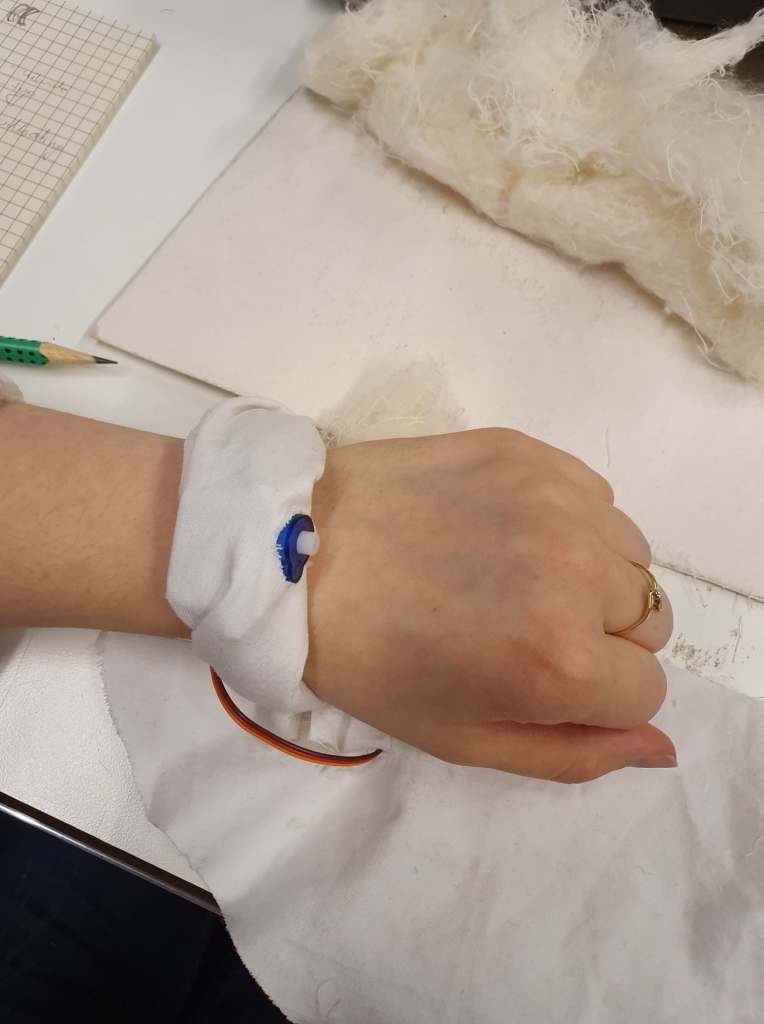
The idea was to create a bracelet with the servo that will create vibrations that will notify you when you arrive there.
Sketch of idea #4
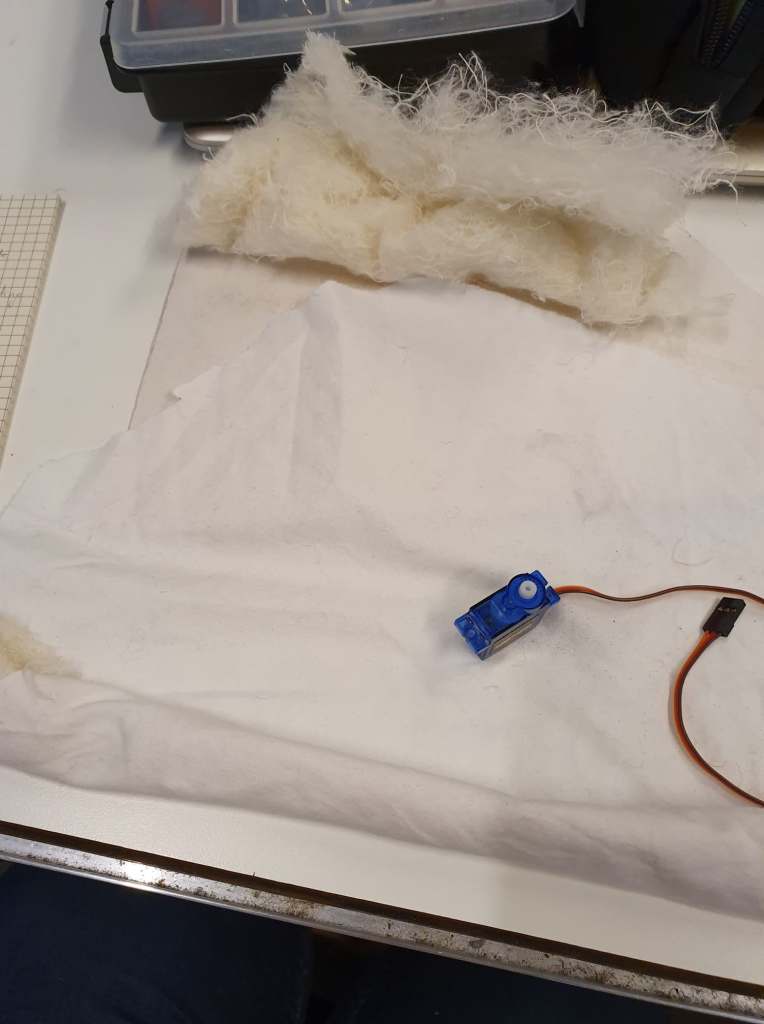
To test out how one bracelet might look, I worked on a quick prototype that explored the material and the feeling of it.
It was made out of simple white material filled with fluffy strings that surrounded the motor. The fluffy strings were used to make it more comfortable to be worn without hurting the wrist or being uncomfortable.
We did no proceed with this idea, since we wanted to get feedback first from the next coaching session before exploring the idea and experiment with the problem more in depth.
Today we had coaching with Clint. During the coaching session we presented our sketches and the brainstorming ideas we had so far.
The presentation of the ideas, did not go well. They were mostly incomplete or were missing the point of the project. Based on Clint’s feedback they were lacking of answers for few questions. What exactly are we trying to achieve when working on them? What is that makes us curious about finding out things from the experiments? What is the feedback and the feedforward in it? Clint’s suggestion was to dig deeper into questioning the ideas itself. For example for our first idea with the finger movement and the typing, we can ask ourselves how exactly would it feel to pull a finder on that said string that connects the servo and them. To try making few quick and easy prototypes where we would explore the usage of different materials as strings and so on.
As regards of the second idea, he advised us to try finding a way to make the servo to afford feedback or feedforward rather than being used as an input. The servo motor we thought we might be able to use, requires force to be moved and it is more mechanical rather than being used as an data entry piece. The following questions should be discussed more in the following days. How can we present continues feedback of an activity? How can the servo be implemented in the project as an output rather than input.
Clint also suggested, to find a concrete thing or situation that we can create for with all of its surrounding elements. This is not a project where we are supposed to create a solution for a certain person, but rather we should focus on finding a problem with complexity and explore it.
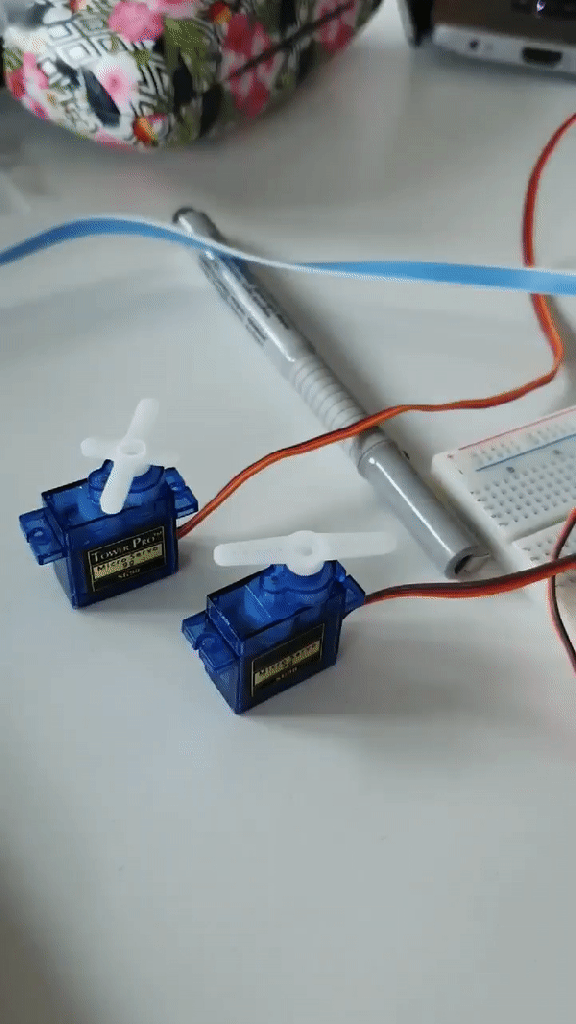
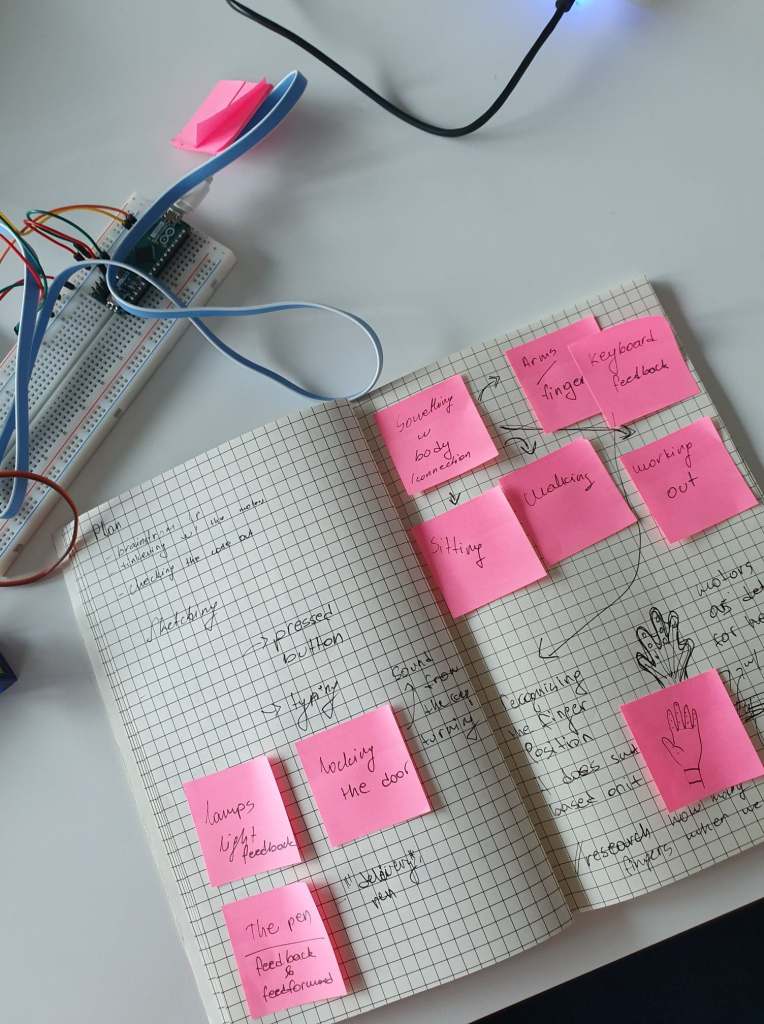
Continuous activity. What does offer activity that allows us to do it without thinking about it? How can a situation or an object to express affordance, feedback or feed forward? As part of module II, we need to figure out a way to express those requirements, with the usage of motors. The motors we are working with this project are Servos! They spin and then spin some more.
To being with we started by brainstorming for possible ideas and interactions we can create with the servos. At first we tried to think of things that offer feedback and feed forward. From the lights which give feedback when we turn them on and off, to the sound of the keyboard when we type on it. We had an basic idea of tracking the way we type on the keyboard without being aware how our fingers do this continues action. We sketched out a basic hand sketch which might detect a finger movement when we press down.
The first day we tried to brainstorm as much as possible which eventually continued towards day two. We decided to work from home. The goal was to sketch-out the ideas we had, and connect the servos to the json – serial bridge.
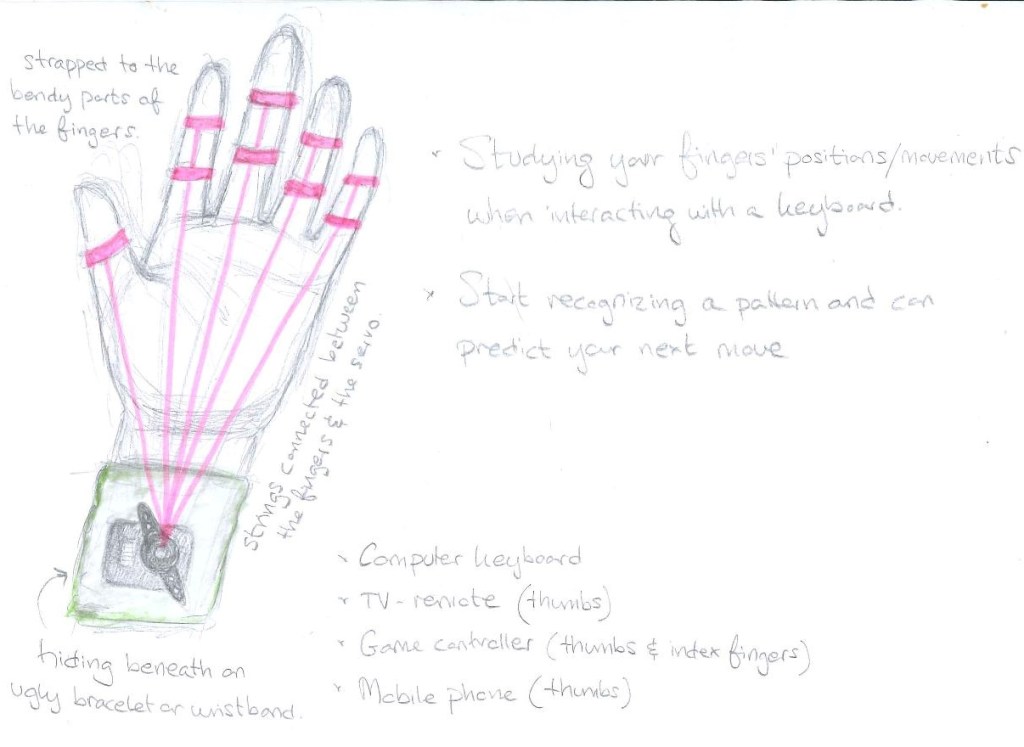
Sketch of idea #1
First idea was the detection of the finger movement when we type on the keyboard. We imagined ring – like attachments that will move the servo and can detect of when we press a key depending on the height we place our fingers. The product was supposed to be in a bracelet shape which will hold the servo and will hold the strings that connect the fingers and the servo. When sketching out the idea, we mostly focused on the continues activity of typing, where one rarely thinks of how we type. We also may wonder which fingers we type the most, and once we become aware of the way we type it becomes more difficult to type faster as we are stopping and thinking about it.
Sketch of idea #1
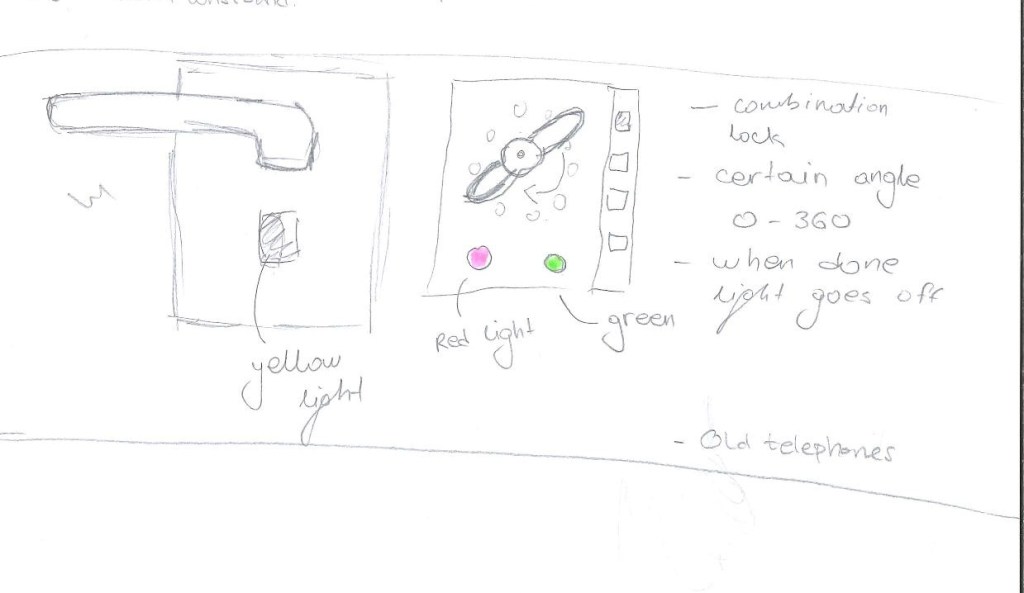
Sketch of idea #2
This sketch was mostly focused on the way we express feedback with leds. Even though it was not connected to coping, we decided to sketch it out since it presents continues feedback as it is being used. To create input we were supposed to use a servo that can detect movement. This sketch did not inspire or make me come up with interesting questions. I think the sketch was mostly focused on the input rather than how we are supposed to present the outcome.
Sketch of idea #2
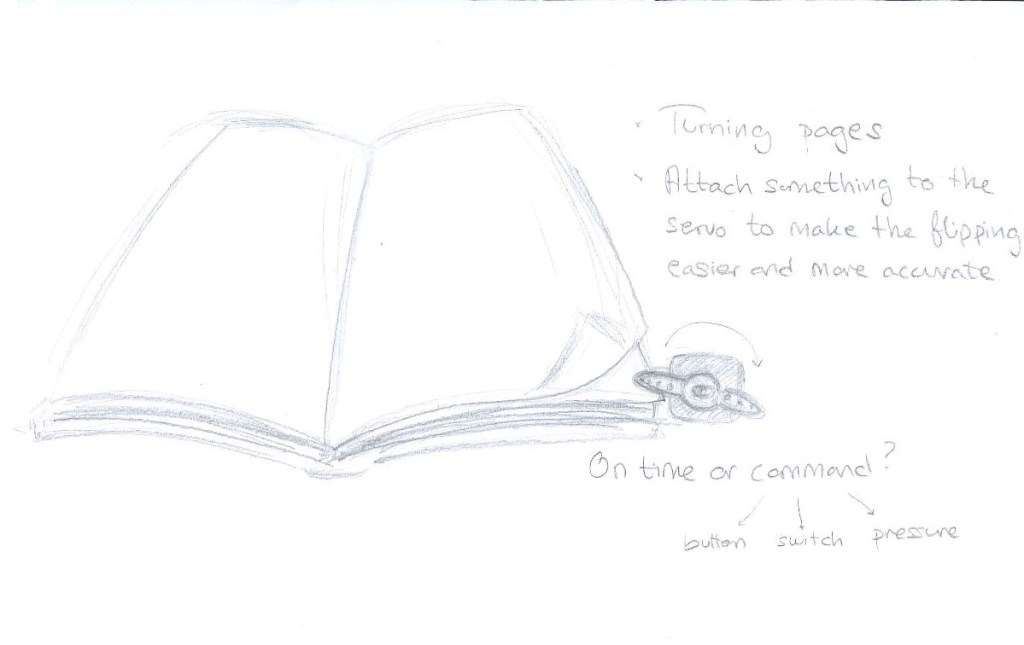
Sketch of idea #3
The servos allow spinning motion. We were wondering what exactly can be done with it. This is how we thought that the mechanics of the servo can be used to turn pages of a book. Reflecting on it, I realise it has nothing to do with expressing feedback or presenting a state of something. It is not connected with coping or continuous activity that we do without thinking. At the moment we were only focusing on getting more ideas out and just brainstorming.
Today’s lecture was based on the methods we are supposed to work with while working on a project. This should help with questions like what are we supposed to do and how are we supposed to do methodology wise.
The second module when exploring we should be interaction driven. The knowledge should be gained by exploring different interaction possibilities.
The process of one project should be in somewhat the following steps:
Tinker – Play with technology
Playing with the code to explore and understand the code itself and the material. Rather than using it as an ideation session this is to be granted better understanding and base.
Ideation/Sketch
Brainstorming and sketching ideas on paper can help with opening up the possibilities to be more creative. Usually sketching is being used since it can be fast and inexpensive when ideating. It allows exploration.
Implement
This is the technical part of the project. In this stage we implement our ideas to the code and work with it to create a working experiment.
Reflect/Experience
In the last stage we should reflect on the experience and knowledge we gained from the experiment and how it can be improved in the next iteration. We should keep iterating on the experiment, since it might be a failed one, but we can get that as a learning experience.
Sketching is a another method we should use while working on a project. The drawing can be used as an experiment that can be used for discovering and exploring. Sketching can also be seen as a process or as a product. We can sketch revise it and throw it away if we do not see it working. It is a cheap way of presenting and trying things out. It is quick and usually big time saver.
While sketching on a paper is a very quick, sketching with code can be more time consuming. Proficient knowledge in coding is also needed to create more expressive sketches rather than using paper. It can also be understood more as implementation. We usually ask ourselves questions such as would this work if i change this? How would it react if I add new function? How would it look like?
It can be said that when we sketch we present concepts rather than implementation.
The topic of this Module would be Coping, and the material we are working with is the motors from our Arduino kit called Servos.
Coping can be understood like a metaphor, like getting a grasp of things. It can be a grasp of an idea or an object. When we are out and exploring the world we interact and cope with our whole body. We are active within the environment, and by doing that we adapt to things. Our bodies respond to the things that are happening, or allow the body to react to the things that are happening.
Skilful coping is usually explained when we know how to deal with a certain situation we have knowledge for. The activities such as tying the shoes and different habits we have that we learned by our parents don’t require to stop and think about how are we doing them rather than they are just happening. Skills in life can be improved by learning. We can get better at doing things. There are different skill levels that one person can have. As it might continue we might wonder what is the difference between someone that is a novice at something and someone that is an expert. Both of these people have the knowledge but the person that is just starting is usually following a set of rules or so called scaffolding. When we are good at doing something we don’t think about it, or the steps we need to take to finish the task. We are just acting on the situation.
This module we are reading the paper “Designing for Coping” by Clint Heyer. In the paper he the talks about the four ‘lenses’. – Malleability – Direct Manipulability – Meta Manipulability – Social Manipulability
With malleability we try to fit an artefact into situation in a durable matter. We set it up for some kind of activity, which we think we might use it later. For example we set up the ingredients for baking a cake then we bake the cake. This should be done in order to be more continuous within the interaction, or make it more fitting for our personal use.
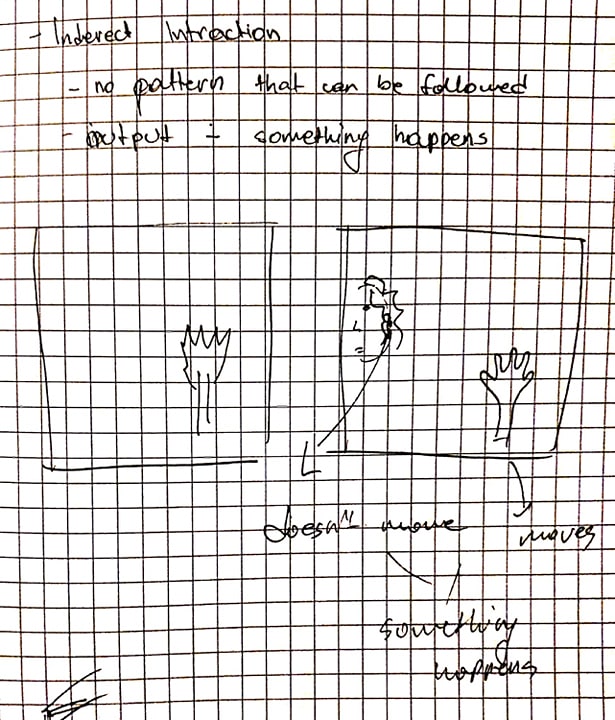
Direct manipulability is coupling of action – response. Which makes me wonder what exactly is direct? How do we decide something is direct interaction and what is not? Is using the mouse with a computer indirectness and interacting with a touch screen directness? What are the consequences of using these different interactions?
Meta manipulability presents the nuance. Nuance is how we are able to work with the tools as objects rather than tools. Their usage with constant flow without interrupting the the activity we are doing. It presents the ability of being able to fit the tools within that said activity, with allowance to make small adjustments to the tools without stopping. It contributes to the continuousness of the interaction.
Social manipulability – how our activity shows up to the others. What kind of feedback the other people get if for example somebody is typing loudly on their computer? What does that present and what kind of affordance can be seen?
In module two we are working on a project where we are supposed to strive towards expressing afforance, feedback and/or feedforward as a textural quality. We should try to deepen the nuance of perceptibility and action. It should be continuosly available and holistic. In the end it should be a presentation of a concept for tools.
To wrap up Module I, we presented the projects in a show ‘n tell presentation. We were supposed to present what we worked on, how we got there and what did we learn in the past three weeks.
Looking at everyone’s projects I must say we did create some interesting interactive environments. People worked with different techniques and different feedback. Some focused on expressing interaction through sound or using the camera as a helpful tool to create some kind of different interactive experience.
From our project, I learned few things. Even thought when we think interaction we imagine a direct interaction where if we press a button we get some kind of output, this project was not based on that. Also complete randomness would not create the needed environment for indirect interaction. As Jens coached us, the goal was to break the line between the input and output while not allowing complete randomness to control the system. The project forced us to look at different things that can be used as input such as brightness in the room, or random points of different bodies within the camera range.
My coding skills got improved in regards of the technical part. The challenges such as combining two different sketches with each other and making their main functions connected in order to get the wanted result offered a way of learning how to work with more complicated code.
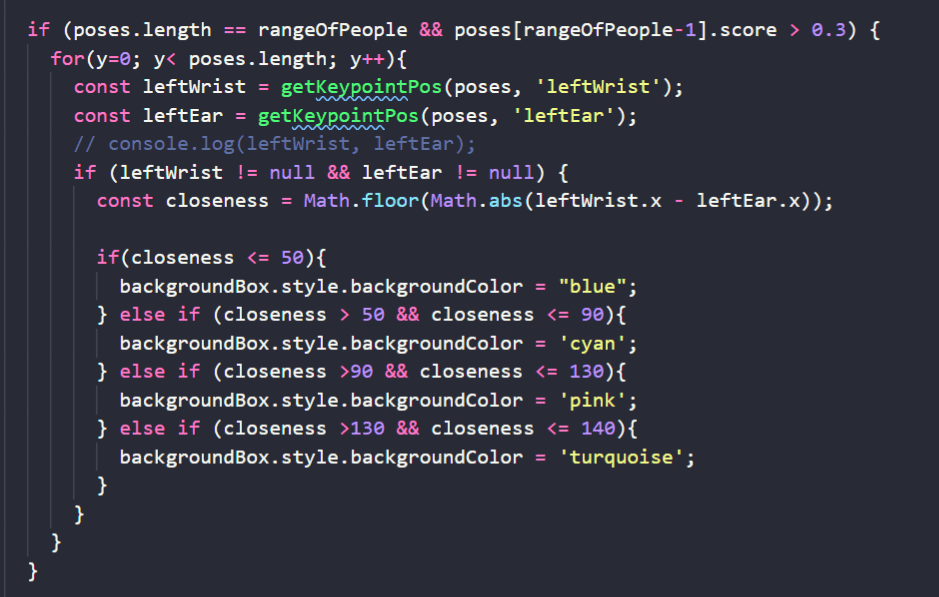
Sketching for the new ideas, was quick since now we had a goal that we strived for. In the end we continued with out last sketch with the wrist control, but from different angle. Instead of having two wrists on the same person, we decided to implement someone’s else wrist. Basically if two or more people are in the frame it takes two random right wrists and it counts the distance between them.
New idea – sketches
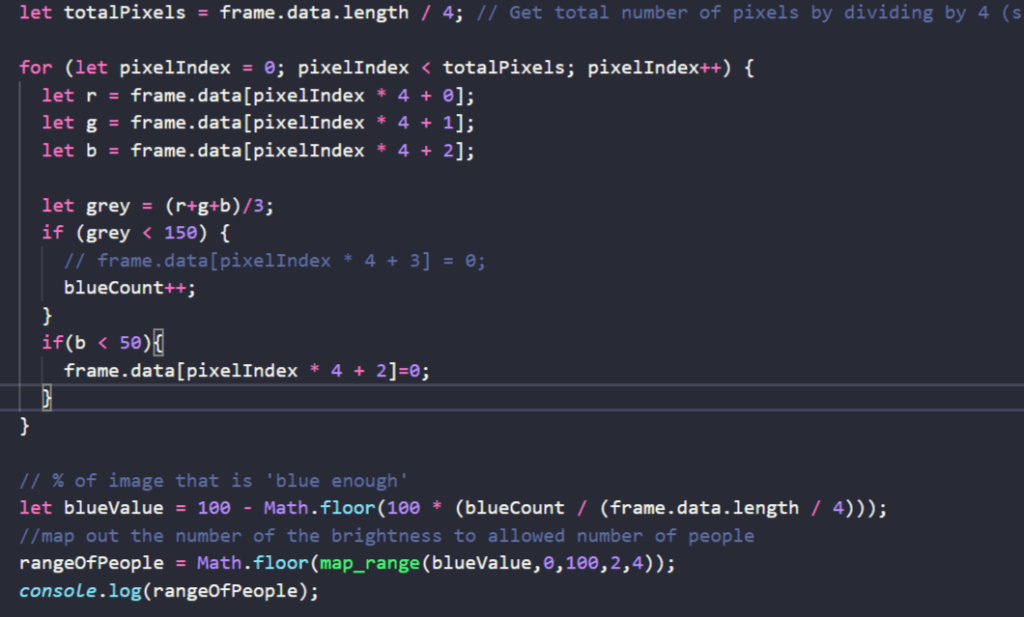
But then we switched to add another factor that can not be controlled sometimes by intention. The brightness of the room. From out tinkering we already had a previous working code that detected the brightness of the room. Now the next challenge was to connect both sketches together. The problem was mostly since they were working on different bases. One was detecting the poses through a library and the other one was working based on pixels and frames. Also we wanted them to be connected with data that can be used as a condition for the detection in the poses.
In the first part of the code it, detects the bright pixels in the frame. It counts out the data and it gets processed through few functions until we get to the range of people.
Then that range of people is used to question whenever the amount of people required to show up on camera is fulfilled. After it is confirmed and the last person has some kind of movement, it takes coordinates of left ear and left wrist from random people within the frame and calculates the distance according to it.
In the end since we were running out of time, we decided to manipulate the colour of a div, with the processed data. If we had more time we might have been able to create better interaction experience overall.